
The thrill of international travel new cultures, breathtaking sights, unforgettable experiences. But amidst the excitement lurks a common dread: the notorious bill shock from international roaming charges. For years, travelers have either fumbled with tiny physical SIM cards, faced exorbitant fees from their home carriers, or painstakingly hunted for local Wi-Fi. Enter the game-changer: eSIM internationally. This embedded SIM is revolutionizing how we stay connected abroad, offering a seamless, affordable, and flexible way to access mobile data without the fear of returning home to a bank-breaking phone bill. This comprehensive guide will navigate you through the world of international eSIMs, empowering you to explore the globe while staying connected, minus the roaming nightmares.
The beauty of an eSIM, or embedded Subscriber Identity Module, lies in its digital nature. Unlike its plastic predecessor, an eSIM is a small chip already built into your smartphone, tablet, or smartwatch by the manufacturer. This means no more fiddling with SIM ejector tools or worrying about losing your tiny home SIM card while abroad. The activation and management of your mobile plan happen digitally, usually through scanning a QR code or via an app provided by an eSIM carrier. This fundamental difference is what unlocks the potential for significant savings and unparalleled convenience for international jet setters. By sidestepping your primary mobile provider’s expensive international roaming packages, you can tap into local or regional data plans offered by a multitude of global eSIM providers, often at a fraction of the cost. This puts you in control, allowing you to choose a plan that best suits your destination, data needs, and budget, all before you even step on the plane.
Understanding the eSIM Advantage: More Than Just Avoiding Roaming Fees
The allure of eSIM technology for international travel extends far beyond merely dodging hefty roaming charges. It offers a cascade of benefits designed to make your journey smoother and more connected.
The Core Benefit: Sidestepping Exorbitant Roaming Costs
This is the primary draw for most international travelers. Traditional roaming charges accrue because your home network provider has agreements (or lack thereof) with foreign networks, and they pass these often-inflated costs onto you. With an eSIM, you essentially purchase a local or regional data plan directly from a provider that operates in your destination country or region. Think of it as buying a local SIM card, but without the physical card. You pay local rates for data, which are almost invariably cheaper than what your home carrier would charge for roaming. Some eSIM providers even offer global plans that cover multiple countries, perfect for those on a multi-destination trip, still at prices significantly lower than traditional roaming. This direct-to-local-network approach is the key to unlocking substantial savings.
Moreover, the transparency in pricing with eSIM plans is a breath of fresh air. You typically pay upfront for a set amount of data valid for a specific period (e.g., 5GB for 30 days). There are no hidden fees or unexpected charges, as long as you operate within the parameters of your purchased eSIM plan. This predictability allows for better budgeting and peace of mind, knowing that your connectivity costs are fixed and controlled. Many providers also offer easy top-ups through their apps if you find yourself needing more data, ensuring you’re never caught off-guard or disconnected.
Unparalleled Convenience and Flexibility
The convenience factor of eSIMs cannot be overstated. Imagine landing in a new country and being connected to the internet within minutes, without having to find a local SIM card vendor, navigate language barriers, or go through cumbersome registration processes. You can purchase and install your eSIM plan from the comfort of your home before you even depart. Upon arrival, you simply activate your eSIM profile in your phone’s settings, and you’re good to go.
Furthermore, most modern smartphones that support eSIM technology also allow for Dual SIM functionality. This means you can keep your primary physical SIM (or another eSIM) active for calls and texts from your home number (though be mindful of roaming charges for these if you use them) while using your travel eSIM purely for affordable data. Many eSIM plans are data-only, which is perfect for using internet-based communication apps like WhatsApp, FaceTime, Skype, or social media to stay in touch, further reducing reliance on traditional call and text services that might incur roaming fees on your primary line. The ability to store multiple eSIM profiles on a single device is another significant advantage. If you’re country-hopping, you can have several eSIMs ready and switch between them with a few taps in your settings, ensuring seamless connectivity wherever your adventures take you.
Getting Started: Your Step-by-Step Guide to International eSIM Usage
Transitioning to an eSIM for your international travels is a straightforward process. Here’s how to get set up and start saving:
Step 1: Confirm Device Compatibility and Unlock Status
The first crucial step is to ensure your smartphone or device is eSIM compatible. Most newer models from major manufacturers like Apple (iPhone XR and later), Google (Pixel series), and Samsung (Galaxy S series and later, Fold/Flip series) support eSIM technology. A quick check of your device’s specifications on the manufacturer’s website or a simple Google search for “[your device model] eSIM support” will provide the answer.
Equally important is to ensure your device is “unlocked.” This process can sometimes take a few days, so it’s best to do it well in advance of your trip.
Step 2: Choose Your eSIM Provider and Plan
The eSIM market has exploded in recent years, offering a plethora of choices. Popular international eSIM providers include Airalo, Holafly, Nomad, Yesim, GigSky, and Ubigi, among many others.
When choosing a provider and plan, consider the following:
- Destination(s): Some providers offer country-specific plans, while others have regional (e.g., Europe, Asia) or global plans. Choose what aligns with your travel itinerary.
- Data Allowance: How much data do you typically use? Consider your needs for maps, Browse, social media, streaming, and video calls. Plans can range from 1GB to unlimited data options. It’s often more cost-effective to buy a slightly larger data bundle than to top up frequently.
- Plan Validity: eSIM plans come with an expiration date, ranging from a few days to several months. Match the validity to the duration of your trip.
- Price: Compare prices between providers for similar data packages and validity periods.
- Network Coverage: Check which local networks the eSIM provider partners with in your destination. Reputable providers usually partner with major local carriers, ensuring good network quality and coverage.
- Voice and SMS Needs: Most travel eSIMs are data-only. If you need a local phone number for calls and texts, some providers offer plans that include these, or you might consider using your primary SIM for incoming calls/texts (being aware of potential charges) and relying on data for everything else.
- Ease of Use: Look for providers with user-friendly apps for purchasing, managing, and topping up plans. Customer reviews can be a good indicator.
Many providers allow you to purchase plans directly through their website or dedicated mobile app.
Step 3: Purchase and Install Your eSIM
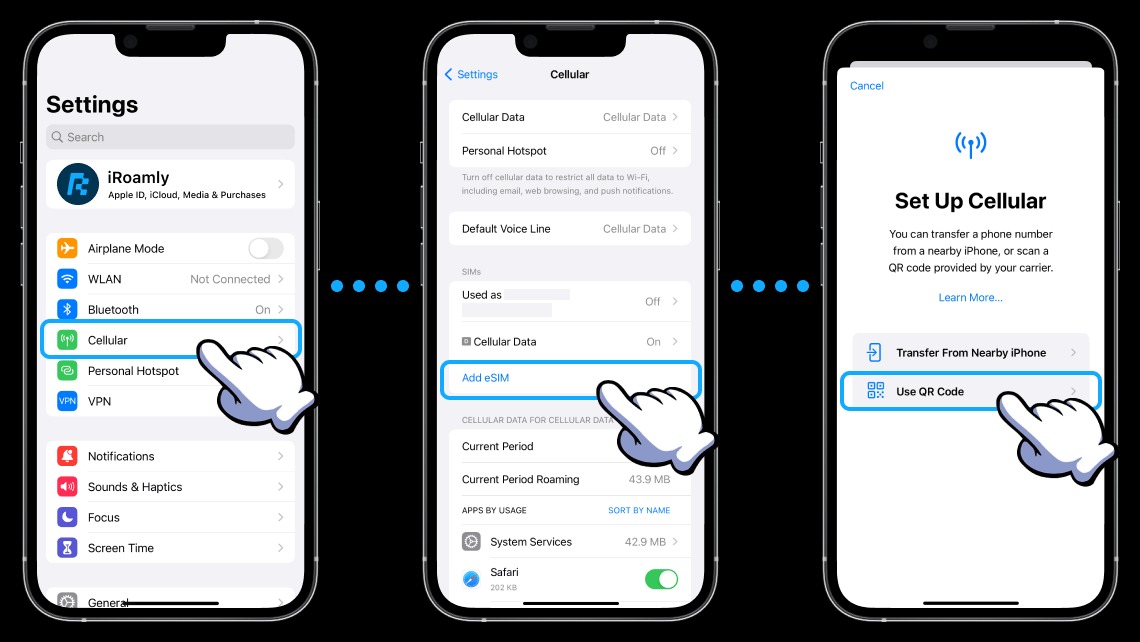
After selecting your plan, you’ll proceed with the purchase. Once completed, the provider will typically send you a QR code via email or within their app. This QR code contains the profile information for your eSIM.
To install the eSIM on your device:
- On iPhone: Go to Settings > Cellular (or Mobile Data) > Add Cellular Plan (or Add eSIM). Your phone will prompt you to scan the QR code. Alternatively, some providers offer manual activation details if QR code scanning isn’t possible.
- On Android (steps may vary slightly by manufacturer): Go to Settings > Network & Internet > SIMs (or SIM card manager) > Add eSIM (or “+”).
Ensure you follow the provider’s specific instructions carefully. You can usually label your eSIM (e.g., “Europe Data,” “Japan Travel”) to easily identify it.
Step 4: Activate and Configure for Roaming-Free Data
Activation processes can vary slightly. Some eSIMs activate automatically upon installation or when they first connect to a network in the destination country. Others might require you to manually activate them through the provider’s app or by changing a setting on your phone. Always refer to the instructions from your eSIM provider.
To ensure you don’t incur roaming charges from your primary SIM, it’s crucial to configure your phone settings correctly:
- Designate your eSIM for Mobile Data: In your phone’s cellular/mobile data settings, select your newly installed travel eSIM as the line to use for mobile/cellular data.
- Turn OFF Data Roaming on your Primary SIM: This is paramount. Go into the settings for your primary SIM and ensure “Data Roaming” is switched off. This prevents your home carrier from connecting to data services abroad and charging you roaming fees.
- Decide on your Primary Line for Voice & Text: You can choose to keep your primary line active for voice and texts if you wish to receive calls and SMS on your home number. However, be aware that making or receiving calls, and sending texts on your primary line while abroad may still incur roaming charges from your home carrier, depending on their policies. For completely avoiding charges, you might consider turning off your primary line entirely or setting it to Wi-Fi calling only if supported and you have Wi-Fi access.
- Disable “Allow Cellular Data Switching” (or similar settings): Some phones have a feature that allows your phone to automatically switch to the other SIM for data if one has a poor connection. Disable this to ensure your phone strictly uses your travel eSIM for all data, preventing accidental usage (and charges) on your primary SIM.
People Also Ask (FAQs)
Q1: Can I use my regular phone number with an international eSIM?
A: Most international travel eSIMs are data-only, meaning they don’t come with a phone number for traditional calls and texts. However, you can keep your primary SIM (with your regular number) active for receiving calls and texts (be mindful of potential roaming charges from your home carrier for these). For outgoing calls and messages, you can use data-based apps like WhatsApp, Skype, FaceTime Audio, or Telegram with your eSIM data. Some eSIM providers are starting to offer plans that include a local phone number or international calling/texting bundles, so check with the provider if this is a crucial requirement for you.
Q2: What happens if I run out of data on my eSIM plan?
A: Most eSIM providers offer the ability to easily top up your data or purchase a new plan directly through their app or website. The process is usually quick and straightforward, allowing you to add more data without needing a new QR code in many cases. It’s wise to monitor your data usage through your phone’s settings or the provider’s app to avoid running out unexpectedly.
Q3: Can I use an eSIM and a physical SIM at the same time?
A: Yes, most eSIM-compatible phones are also Dual SIM, Dual Standby (DSDS) capable. This means you can have one physical SIM card and one (or more, though typically only one other can be active alongside the physical SIM for data/voice simultaneously) eSIM active at the same time.
Q4: Is my phone unlocked? How do I check?
A: If you bought your phone outright directly from the manufacturer or a retailer (not tied to a carrier contract), it’s usually unlocked. The easiest way to check is to try inserting a SIM card from a different carrier. Alternatively, you can contact your current carrier and ask them about your phone’s lock status and their unlocking policy.
Q5: Are eSIMs secure?
A: eSIMs are generally considered as secure, if not more so, than physical SIM cards. The activation process via QR codes and digital provisioning is also secure. As with any digital service, it’s important to use reputable eSIM providers.
Q6: What if I have trouble activating my eSIM abroad?
A: First, ensure you have a stable Wi-Fi connection, as this is often needed for the initial download and activation of the eSIM profile. Double-check that you’ve followed the provider’s instructions correctly, including scanning the QR code properly. If problems persist, restart your device. Most offer online chat or email support. It’s a good idea to have their contact details or app downloaded before you travel.
Q7: Can I switch between different eSIM plans while traveling?
A: Yes, if your device supports storing multiple eSIM profiles, you can typically switch between them through your phone’s cellular or mobile network settings. This is useful if you have different eSIMs for different countries or regions on a multi-destination trip. Just ensure only one data plan is active at a time to avoid confusion or unintended charges.
Read More Also: How to Become a Travel Agent Without Experience
Conclusion: Embrace the Future of Travel Connectivity
The era of dreading international roaming charges is rapidly coming to a close, thanks to the innovative and traveler-friendly eSIM technology.
As you plan your next eSIM Internationally adventure, take the time to explore the world of eSIMs. Check your device compatibility, research providers that cater to your destinations, and familiarize yourself with the simple setup process. Say goodbye to roaming rip-offs and hello to a new standard of global connectivity.